

In the high-stakes environment of prehospital medicine, the ability to perform a successful intubation on the first attempt is critical. The complexity of prehospital airway management cannot be understated, given the challenging conditions and the acuity of patients encountered. This article delves into the strategies and techniques that can significantly improve the success rates of prehospital intubations, focusing on preparation, positioning, and the SALAD (Suction-Assisted Laryngoscopy and Airway Decontamination) method.
The Imperative of First Attempt Success
The initial attempt at intubation is paramount. Studies suggest that subsequent attempts may be associated with increased adverse outcomes. Hence, the emphasis on making the first attempt the best attempt is not just a guideline but a principle that could save lives. To achieve this, thorough preparation and an understanding of the patient’s anatomy and the challenges inherent in prehospital settings are essential.

Equipment Preparation and Patient Assessment
Success begins long before the laryngoscope is inserted. Proper preparation of equipment and a patient positioning lay the groundwork for a successful intubation. Key steps include:
- Ensuring all necessary equipment is ready and functional, including suction devices, intubation blades, and alternative airway devices.
- Conducting a detailed patient assessment to anticipate potential challenges. This includes evaluating the patient’s facial structure, mouth opening, and any anatomical variations that may complicate the procedure.
Optimal Positioning for Intubation
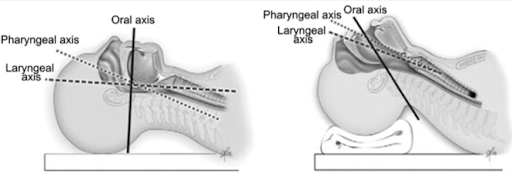
Proper positioning of the patient can significantly impact the ease of intubation. The ideal position involves aligning the ear to the sternal notch, which facilitates a direct path to the airway. Adjustments, such as placing a towel under the patient’s head, may be necessary to achieve this alignment. This positioning, combined with effective pre-oxygenation, sets the stage for a smoother intubation process.
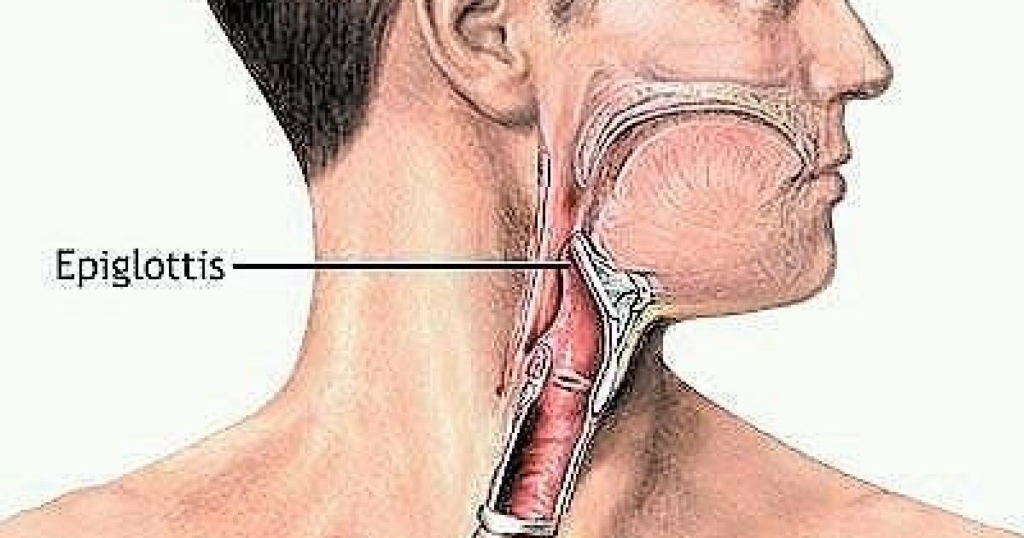
Visualizing the Epiglottis: A Key to Success
A common challenge in intubation is the visualization of the vocal cords. However, focusing on identifying the epiglottis first can simplify this process. The epiglottis serves as a guide to the glottic opening, offering a more reliable landmark in various conditions. Techniques vary slightly depending on the blade used, but the principle remains the same: identify the epiglottis to find the vocal cords. The key to finding the epiglottis is to approach the airway in a slow and controlled manner. Identifying simple structures along the way.
- Start with identifying the tongue
- Insert the blade midline along the tongue
- Slowly advancing identify the uvula and tonsilar pillars
- Passing the uvula continue to follow the tongue to the epiglottis
Using this approach will prevent you from getting lost in the airway. Remember, slow is smooth and smooth is fast.
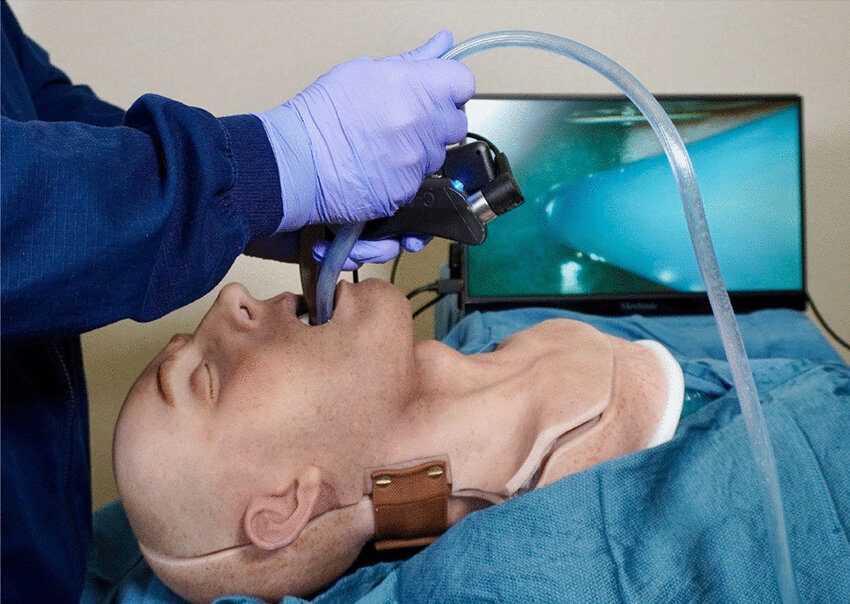
Suction-Assisted Laryngoscopy and Airway Decontamination (SALAD)
SALAD is a technique designed to manage the airway in the presence of contaminants such as blood or vomit. It involves using suction to clear the airway path before and during the insertion of the laryngoscope. This method ensures that the practitioner can maintain a clear view of the airway structures, significantly enhancing the chances of a successful intubation on the first attempt. It is preformed by leading with the suction device and we encourage you to use it on every airway so that you’re never caught unprepared if you do encounter blood or vomit in the airway.
Equipment Preparation
For the SALAD technique, ensure the following equipment is readily available and in working condition:
- A high-powered suction device with a large-bore suction catheter. The Ducanto suction catheter is one commercially available large-bore catheter with specific design features for this technique, but any large-bore suction catheter can be utilized.
- A laryngoscope (video or direct) with the appropriate blade size for the patient. See Mac 3 vs 4 podcast episode
- An endotracheal tube, pre-loaded on a stylet or a bougie for ease of insertion once the airway is visualized.
Step-by-Step Execution
- Initial Setup: Hold the laryngoscope in your left hand, maintaining readiness to insert it into the patient’s mouth. In your right hand, grasp the suction catheter with the opening pointed downwards, forming a closed fist for control and power during suctioning.
- Commence Suctioning: Introduce the suction catheter into the patient’s mouth first, using it to clear the visible contaminants. Advance the catheter towards the base of the tongue, pausing to suction any additional fluids or debris obstructing the view.
- Insert the Laryngoscope: With the right hand still controlling the suction catheter, begin to insert the laryngoscope blade with your left hand. Start at the midline of the tongue, advancing in concert with the suction catheter. This coordinated movement ensures that the laryngoscope does not surpass the suction catheter, which could compromise visibility by smearing contaminants on the laryngoscope’s lens or blade.
- Transition the Suction Catheter: Once a clear path to the epiglottis is established, maneuver the suction catheter to the left side of the patient’s mouth and laryngoscope blade. This movement should be executed in such a way that the catheter remains deep enough to continue effective suctioning but does not obstruct the insertion of the endotracheal tube.
- Maintain a Clear View: As you identify the epiglottis and subsequently the vocal cords, ensure that the suction catheter is positioned to continuously clear the field of view. The catheter should be ready to remove any new contaminants that may emerge, particularly in patients with ongoing bleeding or regurgitation.
- Insert the Bougie and Endotracheal Tube: With the airway visualized, insert the bougie through the vocal cords, using it as a guide for the endotracheal tube. The teamwork aspect is crucial here; an assistant may help by advancing the tube over the bougie while the practitioner maintains direct visualization of the airway.
- Confirm Placement: Once the endotracheal tube is in place, remove the bougie and confirm tube placement using capnography, chest auscultation, and visual inspection for chest rise. If contaminants were present, consider deep suctioning through the endotracheal tube to clear the lower airway.
Team Coordination
The successful application of the SALAD technique requires not only individual skill but also well-coordinated teamwork. Practitioners should rehearse the technique in a simulated environment to streamline the coordination between the person performing the intubation and the assistant managing the equipment. This rehearsal ensures that each step, from suctioning to tube placement, is executed smoothly and efficiently, even under the pressure of an emergency situation.
The SALAD technique is an invaluable tool in the management of difficult airways, particularly in prehospital and emergency settings. By effectively removing contaminants from the airway, SALAD enhances the success rate of intubation attempts, ultimately improving patient outcomes in critical situations.

Practice and Train- The Power of Mental Simulation
Practice and training are key. Use of mannequins and team scenarios are great but resource intensive. To supplement this training discover the power of mental simulation. Mental rehearsal and visualization are powerful techniques that can significantly enhance the performance of emergency medical services (EMS) professionals, especially in complex procedures like intubation. These cognitive strategies involve imagining oneself performing a task successfully from start to finish, engaging all senses and emotions associated with the activity. Here’s how you can apply these techniques to practice and prepare for intubations and other critical procedures, improving your proficiency and confidence in emergency situations.
Understanding Mental Simulation and Visualization
Mental rehearsal and visualization leverage the brain’s ability to form neural connections through imagined practice, similar to those formed during physical practice. By vividly imagining the process of intubation, practitioners can mentally prepare for various scenarios, refine their techniques, and anticipate challenges without the need for physical equipment or a patient.
How to Use Mental Simulation for Intubation
- Find a Quiet Space: Begin by finding a quiet and comfortable space where you can focus without interruptions. This environment helps in achieving a deep level of concentration necessary for effective mental practice.
- Relax and Focus: Engage in relaxation techniques such as deep breathing to clear your mind and focus on the task at hand. Achieving a relaxed state can enhance the clarity and effectiveness of your mental rehearsal.
- Visualize the Setup: Start by imagining the setup for an intubation. Picture yourself gathering and checking all the necessary equipment (laryngoscope, suction device, endotracheal tube, etc.). Visualize the environment you’re in, whether it’s an ambulance, an emergency room, or a patient’s home.
- Perform the Procedure Step-by-Step: Mentally walk through each step of the intubation process. Begin with patient assessment and positioning, moving on to pre-oxygenation, insertion of the laryngoscope, visualization of the airway, and finally, the placement of the endotracheal tube. For each step, imagine the tactile sensations, the equipment’s appearance, and even the potential sounds (such as suctioning).
- Anticipate Challenges: Integrate potential challenges into your mental rehearsal. Envision scenarios such as difficult airway anatomy, the presence of vomit or blood, or equipment failure. Practice mentally navigating these challenges using techniques such as the SALAD method for airway decontamination.
- Incorporate Emotional and Physical Sensations: Engage all your senses in the visualization process. Feel the laryngoscope in your hand, hear the sound of suction, and sense the urgency or calmness required in different situations. Emotionally prepare for the stress and pressure of emergency airway management, and visualize yourself remaining calm and focused throughout.
- Reflect and Refine: After completing your mental simulation, take a moment to reflect on the experience. Identify any areas of uncertainty or discomfort and focus your next mental rehearsal on these aspects. Over time, refine your visualization to incorporate new knowledge and techniques learned from physical practice, continuing education, and real-life experiences.
- Practice Regularly: Like physical skills, mental rehearsal benefits from regular practice. Integrate these visualization sessions into your routine, especially before shifts or while en route to a call where intubation might be required.
Benefits of Mental Rehearsal in EMS
Mental rehearsal and visualization offer several benefits for EMS professionals, including:
- Improved Familiarity and Confidence: Regular mental practice can increase familiarity with the intubation process, building confidence even before physically performing the procedure.
- Enhanced Problem-Solving Skills: By imagining different scenarios and their solutions, practitioners develop a mental toolkit of strategies for overcoming real-world challenges.
- Reduced Anxiety: Mental preparation can help reduce anxiety and stress associated with high-stakes procedures, leading to better performance under pressure.
- Increased Adaptability: Visualization helps in preparing for a wide range of scenarios, making it easier to adapt to unexpected situations during actual intubations.
By incorporating mental simulation and visualization into your preparation routines, you can enhance your intubation skills, improve patient outcomes, and develop a more resilient and adaptable approach to emergency airway management.
Conclusion
Prehospital intubation poses unique challenges, requiring EMS professionals to be adept at navigating complex situations. By emphasizing preparation, patient positioning, and innovative techniques like SALAD, practitioners can improve their success rates and, more importantly, patient outcomes. Mastery of these strategies through practice and mental rehearsal ensures readiness for any airway management scenario encountered in the field.
Additional Resources
Additional Resources-
Published Article on the SALAD Technique